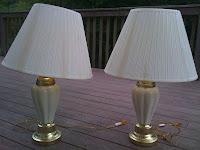
Here's what they looked like when I found them.
So you need to keep an open mind when thrifting. You need to look at the items and visualize what they'll look like after you've worked your magic. These were dusty, brass (ugh..80's!), and had stained, dirty lamp shades. Once I got them home I removed and trashed those horrible shades.
Now you can see the brass in full effect - ugly! I then removed the harp, that's the hardware surrounding the light bulb socket. The new lampshades don't require a harp but I kept the harps as I may need them for a future project.
Here is the prep work. This was really the most time consuming part - 30 minutes or so. I started by taping off (painter's tape) the light bulb socket, and above and below the brass parts. I planned to paint ONLY the brass areas and keep the ivory section. Then I used newspaper to wrap the lamps and keep the ivory safe from the spray paint.
After the taping and wrapping, I sprayed the lamps first with primer. This is always an important step but even more so when painting metal. The paint would just slide off the metal and take forever to dry (plus many extra coats) without primer. Once the primer dried, I sprayed on 2 light coats of Krylon Gloss Black. Tip: 2 light coats is better than one thick and drippy coat. If you do get drips, wait for the paint to dry and sand off the drips.
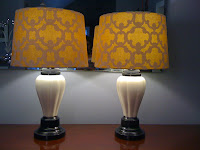
Results of my hard work:
The lamps look completely different from the "before." The shades I bought at Target for $19.99 each. In all, I spent $25 per lamp. I already had the primer, paint, and tape at home, so those were not extra costs. They are now sitting on the sideboard in our dining room. They're update and sleek.
Where can one purchase 2 custom designed lamps for $25 a piece? No where!!!
Before and After:
More dining room progress and transformations to come............


